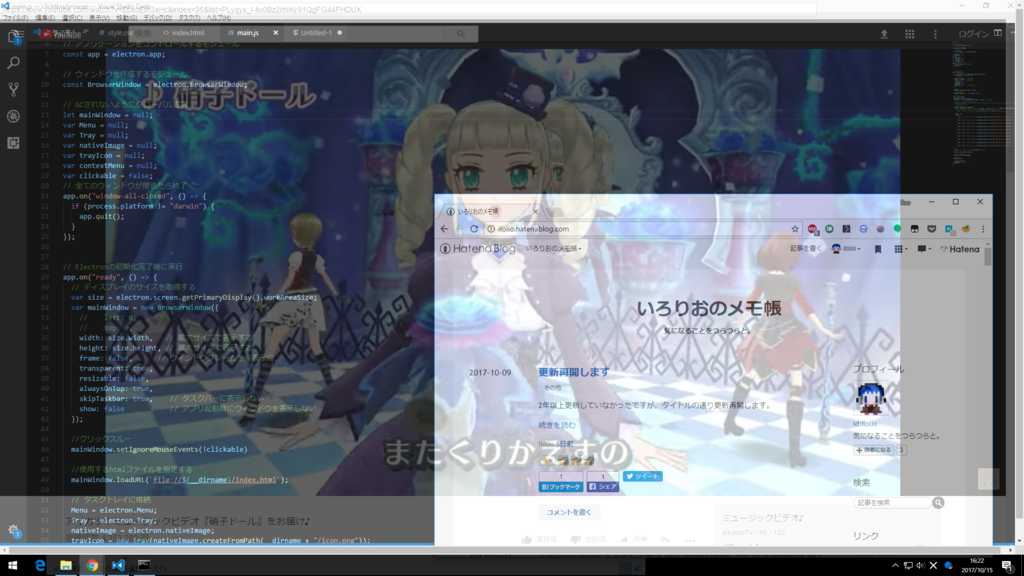
【Electron】半透明なブラウザを作る
はじめに
勉強を兼ねて、Electronで半透明なブラウザをつくってみました。
意外と落とし穴もあったので、備忘録も兼ねて書いておきます。
利用例
半透明 + クリックスルー(click thru) にすれば、動画を垂れ流しながらプログラミングなどの作業ができます。

Electronで半透明なウィンドウを作る方法
2箇所に以下のような記述を足すことで作成できます。 実際の例は参考URLにて。
main.jsの一部
var win = new BrowserWindow({ transparent: true, frame: false })
index.htmlの一部
<script>
  body {opacity:0.6}
</script>
参考URL
半透明なブラウザを作る
半透明なウィンドウ内にwebviewを作成し、そこからwebにアクセスする形を取ります。
htmlに以下のような記述を足すことで作成できます。
index.htmlの一部
<script>
 // reset_webview_wrapper
 var webview_wrapper = document.getElementById("webview_wrapper");
 webview_wrapper.removeChild(webview_wrapper.lastChild);

 // get url
 var url = document.getElementById("url").value;

 // create_new_webview_instanse
 var newWebview = document.createElement("webview");
 newWebview.id = "foo";
 newWebview.setAttribute("src",url);
 // append new_webview
 webview_wrapper.appendChild(newWebview);
</script>
参考URL(というよりも実質コピペ元)
半透明なブラウザを作る際の注意点
webviewを作成せず、外部URLを指定、
mainWindow.webContents.insertCSS('body {opacity:0.6 !important;}');
などで直接CSSを書き換えて透明化はできませんでした。
コード
動作確認をしたコードを載せます。 こちらのコードではトレイアイコンへの格納や、トレイアイコンメニューでのクリック可否選択なども実装しています。詳しくは読んで。
main.js
"use strct";

// Electronのモジュール
const electron = require("electron");

// アプリケーションをコントロールするモジュール
const app = electron.app;

// ウィンドウを作成するモジュール
const BrowserWindow = electron.BrowserWindow;

// GCされないようにグローバル宣言
let mainWindow = null;
var Menu = null;
var Tray = null;
var nativeImage = null;
var trayIcon = null;
var contextMenu = null;
var clickable = true;
// 全てのウィンドウが閉じたら終了
app.on("window-all-closed", () => {
  if (process.platform != "darwin") {
    app.quit();
  }
});


// Electronの初期化完了後に実行
app.on("ready", () => {
  // ディスプレイのサイズを取得する
  var size = electron.screen.getPrimaryDisplay().workAreaSize;

  var mainWindow = new BrowserWindow({
    width: size.width,   // 最大サイズで表示する
    height: size.height, // 最大サイズで表示する
    frame: false,      // ウィンドウフレームを非表示に
    transparent: true,
    resizable: false,
    alwaysOnTop: true,
    skipTaskbar: true,    // タスクバーに表示しない
    show: false           // アプリ起動時にウィンドウを表示しない
  });

  //クリックスルー
  mainWindow.setIgnoreMouseEvents(!clickable)

  //使用するhtmlファイルを指定する
  mainWindow.loadURL(`file://${__dirname}/index.html`);

  // タスクトレイに格納
  Menu = electron.Menu;
  Tray = electron.Tray;
  nativeImage = electron.nativeImage;
  trayIcon = new Tray(nativeImage.createFromPath(__dirname + "/icon.png"));

  // タスクトレイに右クリックメニューを追加
  contextMenu = Menu.buildFromTemplate([
    { label: "クリック可・不可切り替え", click: function () { clickable = clickable ? false : true; mainWindow.setIgnoreMouseEvents(!clickable); } },
    {
      label: 'View',
      submenu: [
        {
          label: "透過なし", click: function () { mainWindow.webContents.insertCSS('body{ opacity:1 !important;}') }
        },
        {
          label: "透過0.7", click: function () { mainWindow.webContents.insertCSS('body{ opacity:0.7 !important;}') }
        },
        {
          label: "透過0.5", click: function () { mainWindow.webContents.insertCSS('body{ opacity:0.5 !important;}') }
        },
        {
          label: "透過0.3", click: function () { mainWindow.webContents.insertCSS('body{ opacity:0.3 !important;}') }
        },
        {
          label: "完全透過", click: function () { mainWindow.webContents.insertCSS('body{ opacity:0 !important;}') }
        },
      ]
    },
    { label: "終了", click: function () { mainWindow.close(); } }
  ]);
  trayIcon.setContextMenu(contextMenu);

  // タスクトレイのツールチップをアプリ名に
  trayIcon.setToolTip(app.getName());

  //ウィンドウを表示
  mainWindow.show();

  // ウィンドウが閉じられたらアプリも終了
  mainWindow.on("closed", () => {
    mainWindow = null;
  });
});
index.html
<!DOCTYPE html>
<html>

<head>
  <meta charset="UTF-8">
  <title>DemoApp</title>
  <meta name="description" content="">
  <meta name="keywords" content="" />
  <meta name="viewport" content="width=device-width,initial-scale=1.0,maximum-scale=1.0,user-scalable=0">
  <meta http-equiv="X-UA-Compatible" content="IE=edge">
  <link rel="stylesheet" href="style.css">
</head>

<body ng-app="app" ng-controller="RootCtrl as root">
  <div id="menu-bar">
    <input type="text" id="url" value="http://electron.atom.io/"></input>
    <button onclick="load();">Load</button>
    <button onclick="opendev();">Open Dev Tool</button>
  </div>
  <div id="webview_wrapper">
  </div>
</body>
<script>
  "use strict";
  window.addEventListener("load", load, false);

  function load() {
    // reset_webview_wrapper
    var webview_wrapper = document.getElementById("webview_wrapper");
    webview_wrapper.removeChild(webview_wrapper.lastChild);

    // get url
    var url = document.getElementById("url").value;

    // create_new_webview_instanse
    var newWebview = document.createElement("webview");
    newWebview.id = "foo";
    newWebview.setAttribute("src", url);
    // append new_webview
    webview_wrapper.appendChild(newWebview);
  }
  function opendev() {
    var webview = document.getElementById("foo");
    webview.openDevTools();
  }

</script>

</html>
style.css
html {
  width: 100%;
  height: 100%;
}
body {
  margin: 0;
  padding: 0;
  height: 100%;
  opacity: 0.6;
}
#menu-bar {
  width: 100%;
  padding: 5px;
  max-height: 30px;
  display: block;
  white-space: nowrap;
}
#menu-bar input {
  width: 80%;
  min-height: 20px;
  font-size: 14px;
}
#menu-bar button {
  font-size: 14px;
  min-height: 20px;
}
#webview_wrapper {
  width: 100%;
  height: 100%;
}
webview#foo {
  height: 100%;
}
その他
- Electron開発環境がない方は、Electronの環境構築(for Windows) - Qiitaなどを参考にすると良いと思います。
- Electronは記述方法が変わっていたりするので、検索で出てくるソースコードをそのままコピペできなかったりするときもあります。適宜いい感じに書き換えてください。
- 開発環境は(個人的には)VSCodeが良いかも。IntelliSenseが効くので楽です。